 SavvyCal Docs
Collecting payments with Stripe
You can charge people when they book a scheduling link. Connect your Stripe account, then pick a Stripe product for the link. The scheduler picks a time, pays with Stripe Checkout, and the event is confirmed once they've paid. The money goes straight to your Stripe account.
You need the Premium plan to connect Stripe. See Plans and pricing.
How do I connect Stripe?
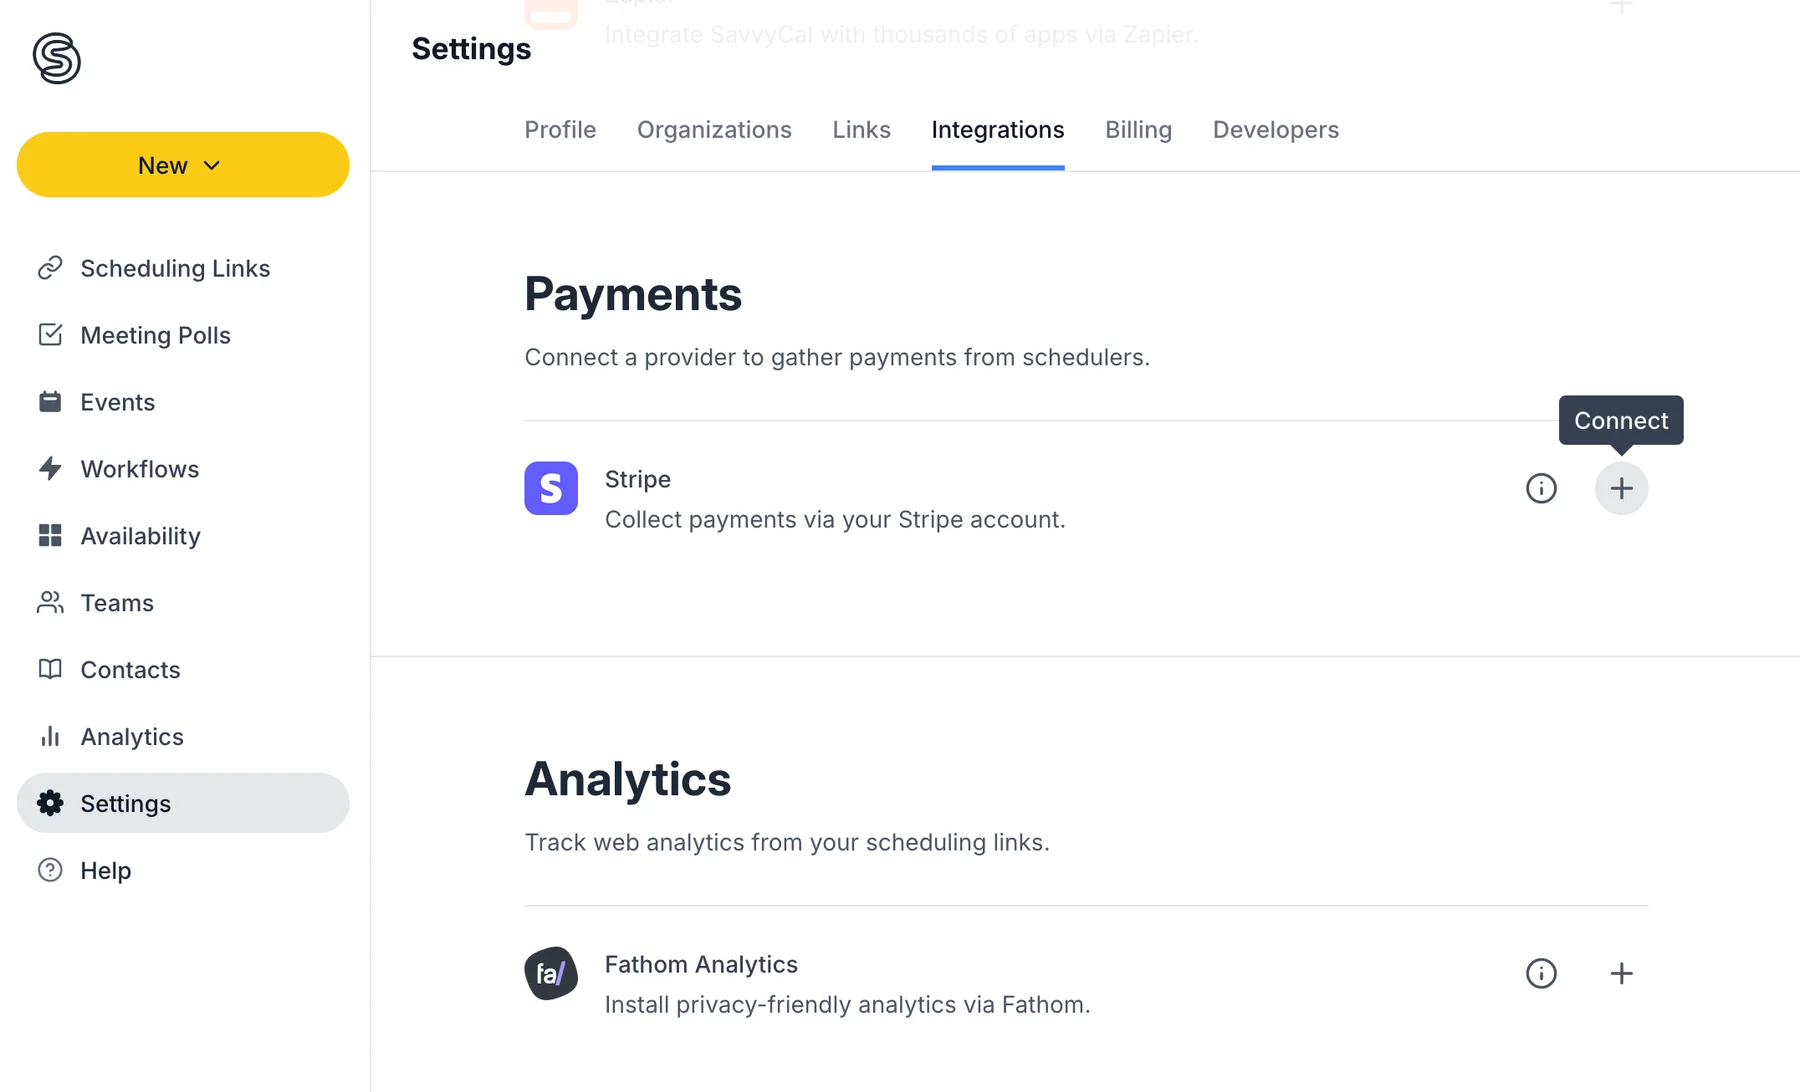
- Go to Settings > Integrations and find Stripe under Payments.
- Click the + button next to Stripe.
- Sign in to Stripe, choose the account you want to use (or create one), and click Connect.
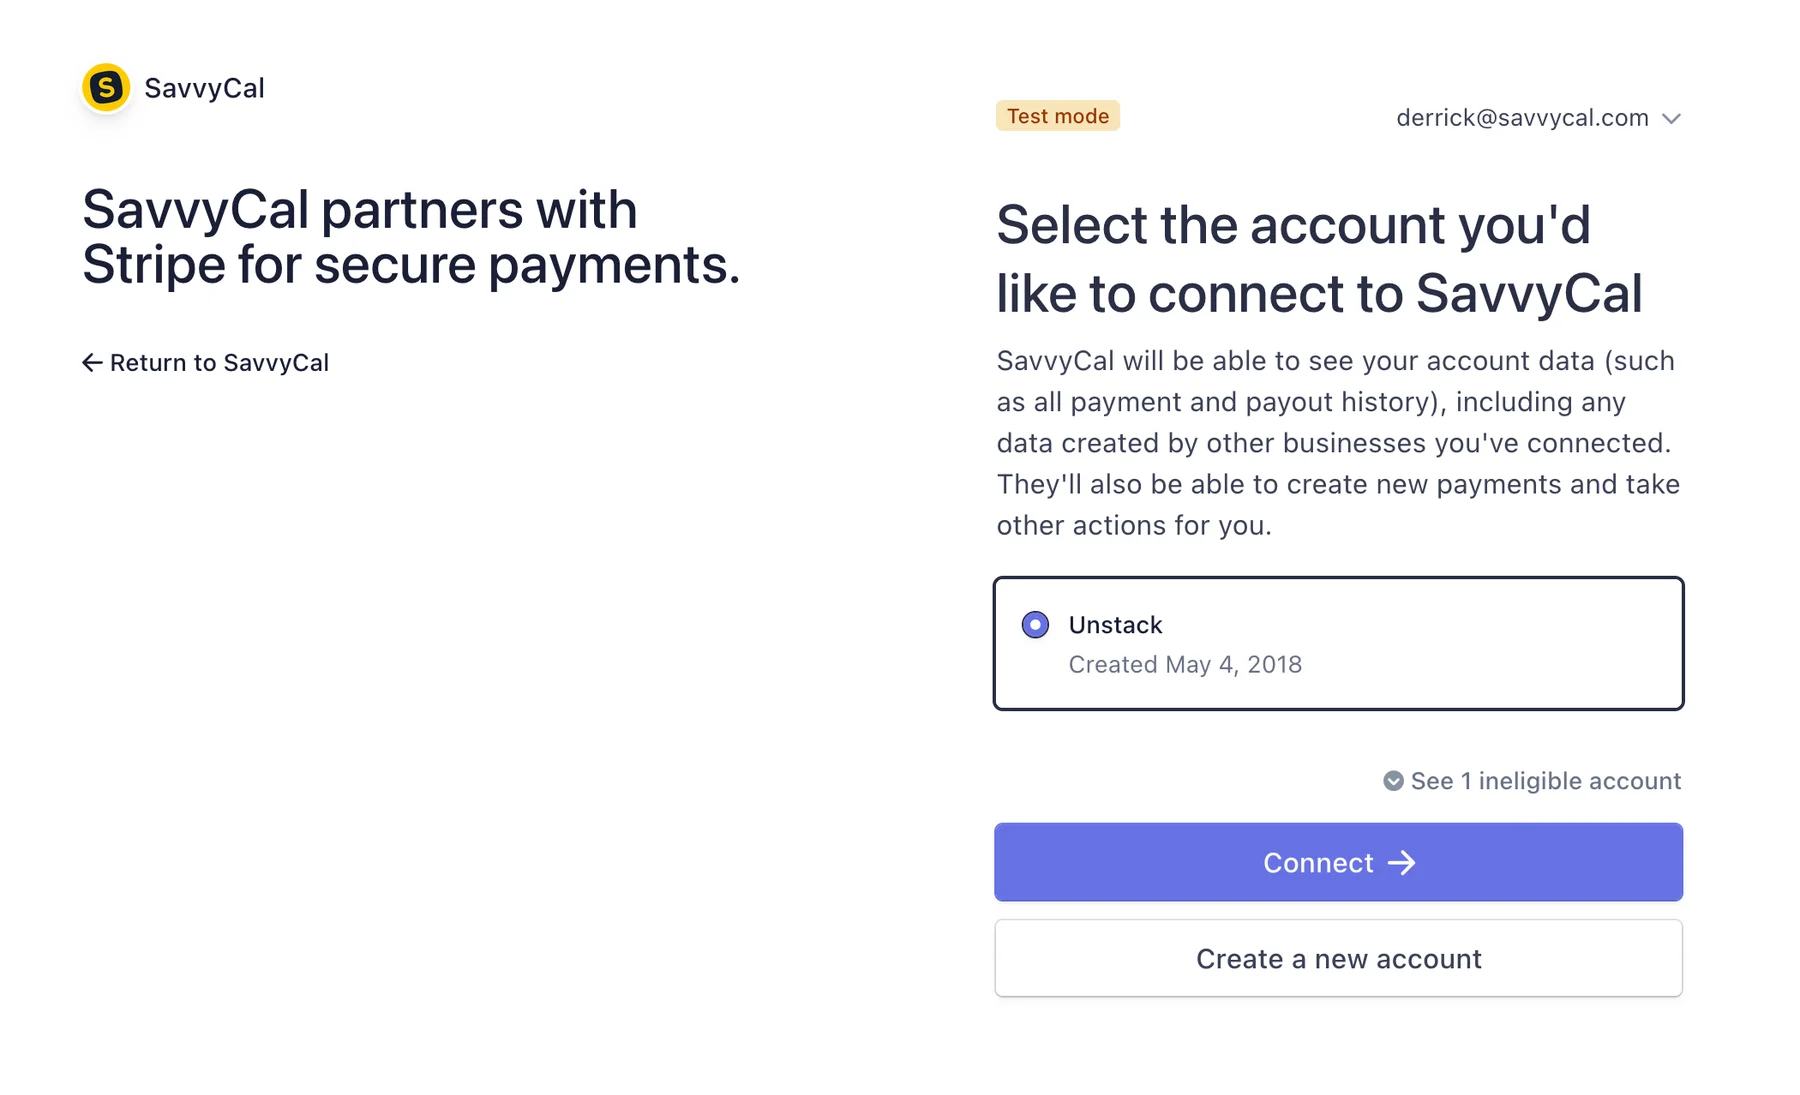
When you're back in SavvyCal, you'll see "Stripe account connected" and the account listed under Stripe with a green check. To connect another Stripe account, click Add an account.
You can also connect from a link. If you open a link's payment settings before connecting Stripe, click Connect my Stripe account, and Stripe sends you back to the link when you're done.
Can my teammates use my Stripe account?
Yes. A Stripe account you connect belongs to your organization, so other members can choose it on their links too. If you manage more than one organization on the Premium plan, SavvyCal asks which organization the account is for before sending you to Stripe.
Each Stripe account can only be connected once per organization. If a teammate already connected it, you'll see "This Stripe account is already connected by another team member." Use the one they connected instead.
How do I charge for a scheduling link?
- Open the link, and under Booking Page Options, click Payments.
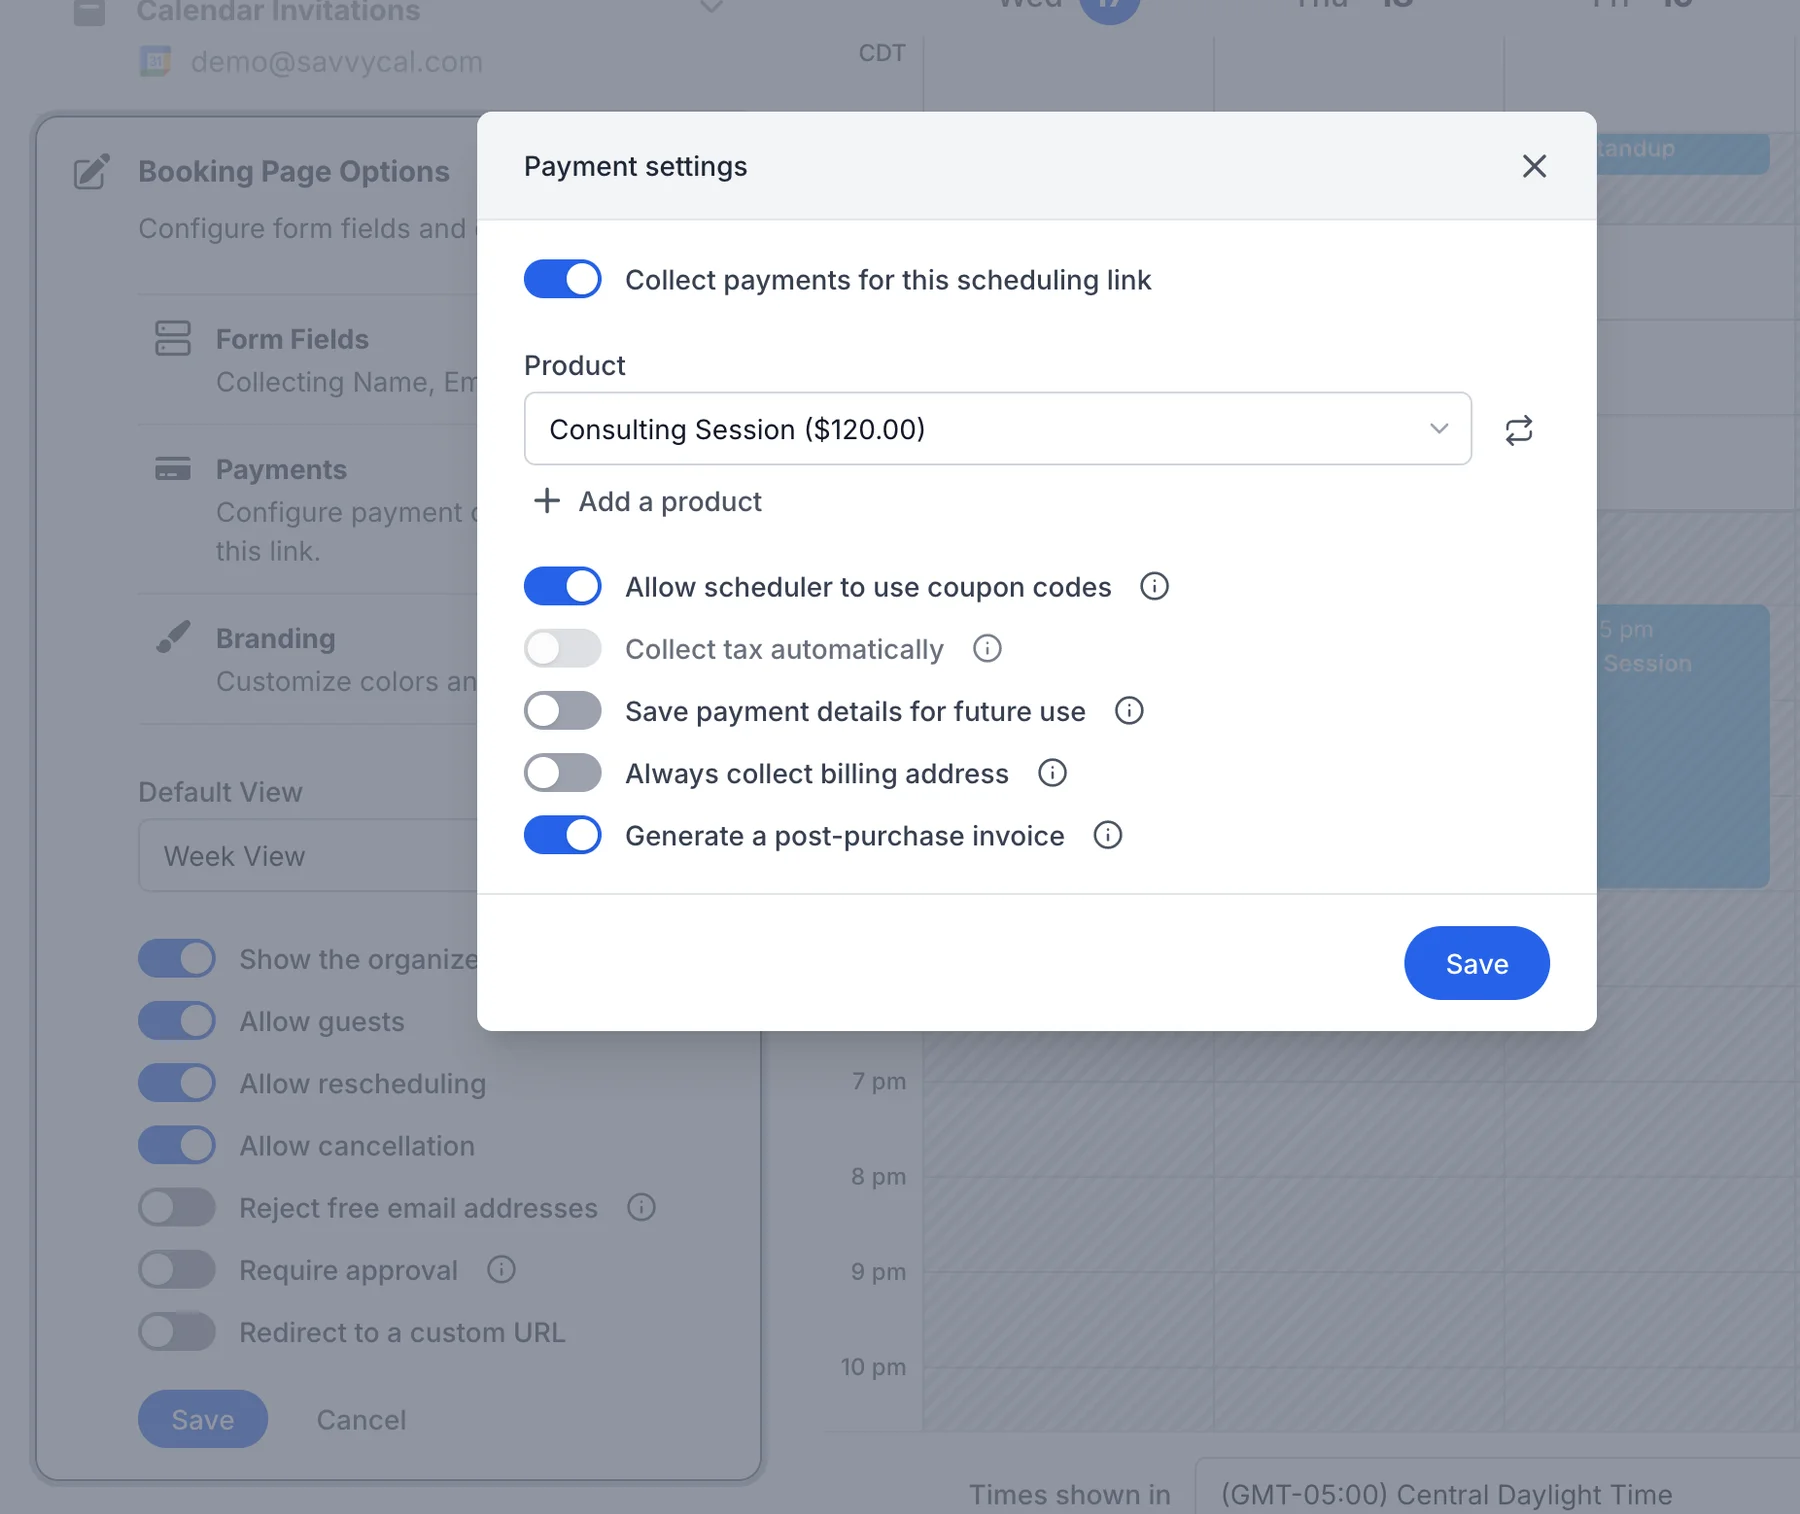
- Turn on Collect payments for this scheduling link.
- If you have more than one Stripe account, choose one under Stripe Account. Payments for this link go to that account.
- Under Product, choose the product to charge for.
- Turn on any checkout options you want.
- Click Enable payments (or Save changes if you're editing).
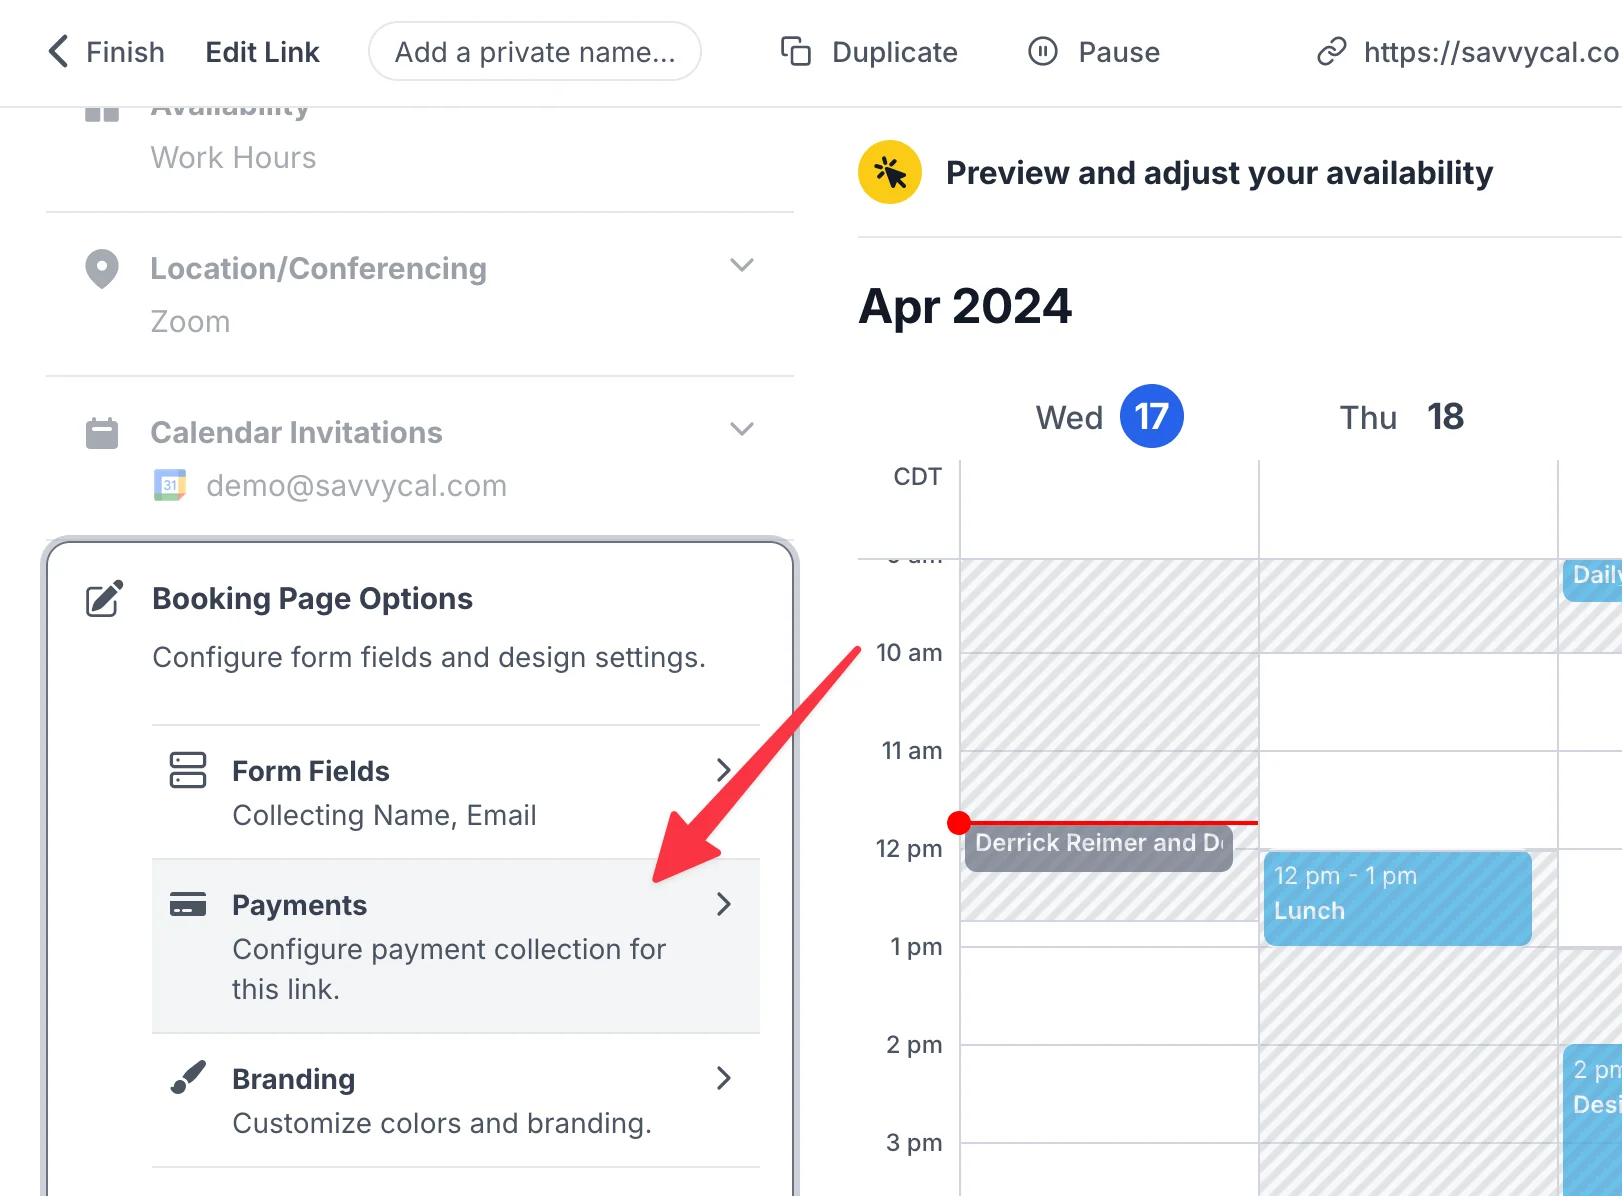
Once it's on, the link shows a green Enabled badge next to Payments.
To stop charging, open Payments again, turn off Collect payments for this scheduling link, and save.
How do I set the price?
The price comes from a product in your Stripe account. The Product menu lists your active products with one-time prices, shown as the product name and price, like "Consulting Session ($120.00)". Recurring (subscription) prices aren't listed.
If you don't have a product yet, click Add a product, enter a Product Name and a Price (in USD), and click Save product. SavvyCal creates the product in your Stripe account and selects it.
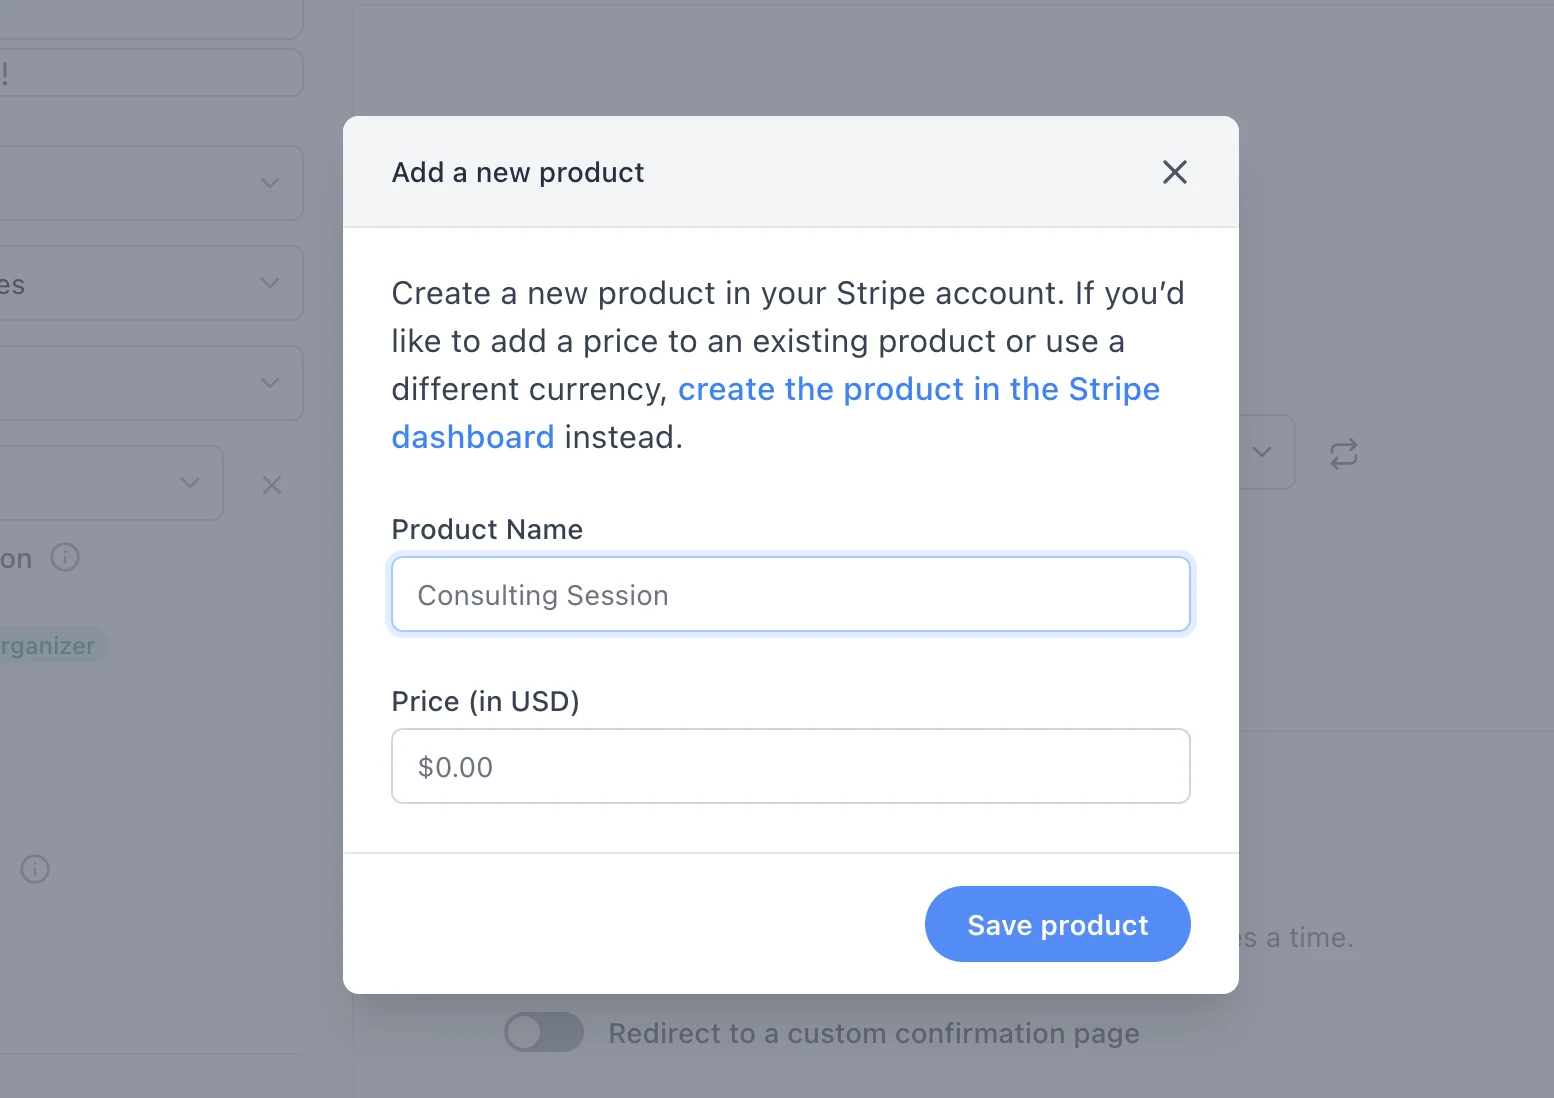
A few things to know about prices:
- Other currencies: products you add from SavvyCal are always in US dollars. To charge in another currency, or to add a price to an existing product, create it in the Stripe dashboard. Then click the refresh button next to Product (Refresh products) to load it.
- One price per link: the link charges the same price for every booking. If the link offers more than one duration, every duration costs the same. For different prices, use a separate link for each.
- Let the scheduler choose the amount: a Stripe price where the customer picks the amount shows up as "(Customer input price)". The booking page shows the price as "Flexible", and coupon codes can't be turned on for it.
What checkout options can I turn on?
The options show up once you've chosen a product. All of them are off to start.
| Option | What it does |
|---|---|
| Allow scheduler to use coupon codes | Shows a coupon code field in checkout, so the scheduler can enter a promotion code you created in Stripe. Not available for customer input prices. |
| Collect tax automatically | Stripe calculates and adds tax at checkout. You need Stripe Tax set up, with a tax behavior on the product's price. |
| Save payment details for future use | Checkout tells the scheduler their payment details will be saved for future payments, and Stripe saves them to the customer in your account. SavvyCal doesn't charge them again. |
| Always collect billing address | Checkout always asks for a billing address. When it's off, Stripe only asks when it needs one, such as to calculate tax. |
| Generate a post-purchase invoice | Stripe creates an invoice for the payment. To email it to the scheduler automatically, turn that on in your Stripe billing settings. |
If Stripe Tax isn't ready for the product you chose, Collect tax automatically is grayed out, and its info icon shows Stripe's reason. After you fix it in Stripe, click the refresh button next to Product to check again.
Checkout also fills in the scheduler's email address from the booking form, and lets them add a business tax ID.
To choose which payment methods schedulers can use, such as Apple Pay or Google Pay, see Configuring Stripe payment methods.
What does the scheduler see?
The booking page shows the price with the link's details. After they pick a time and fill in the form, the button says Proceed to checkout instead of Schedule.
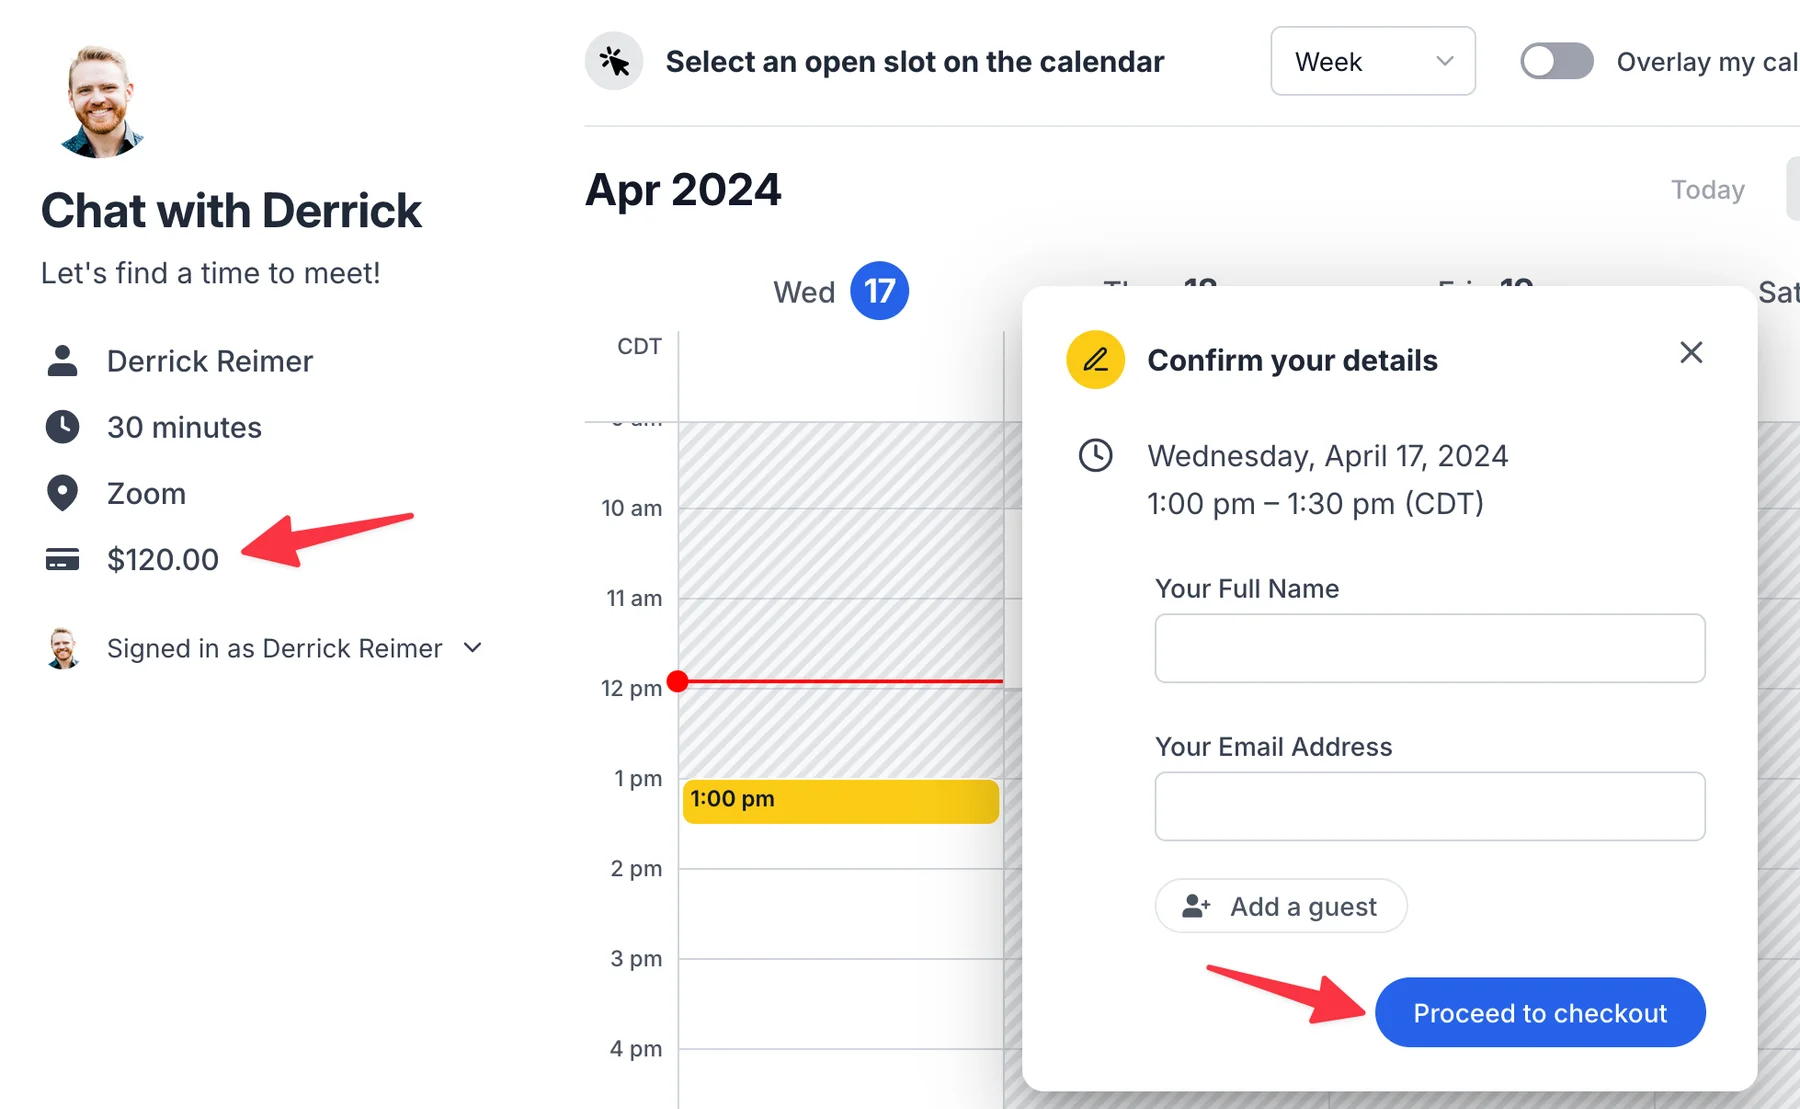
Clicking it sends them to Stripe Checkout to pay.
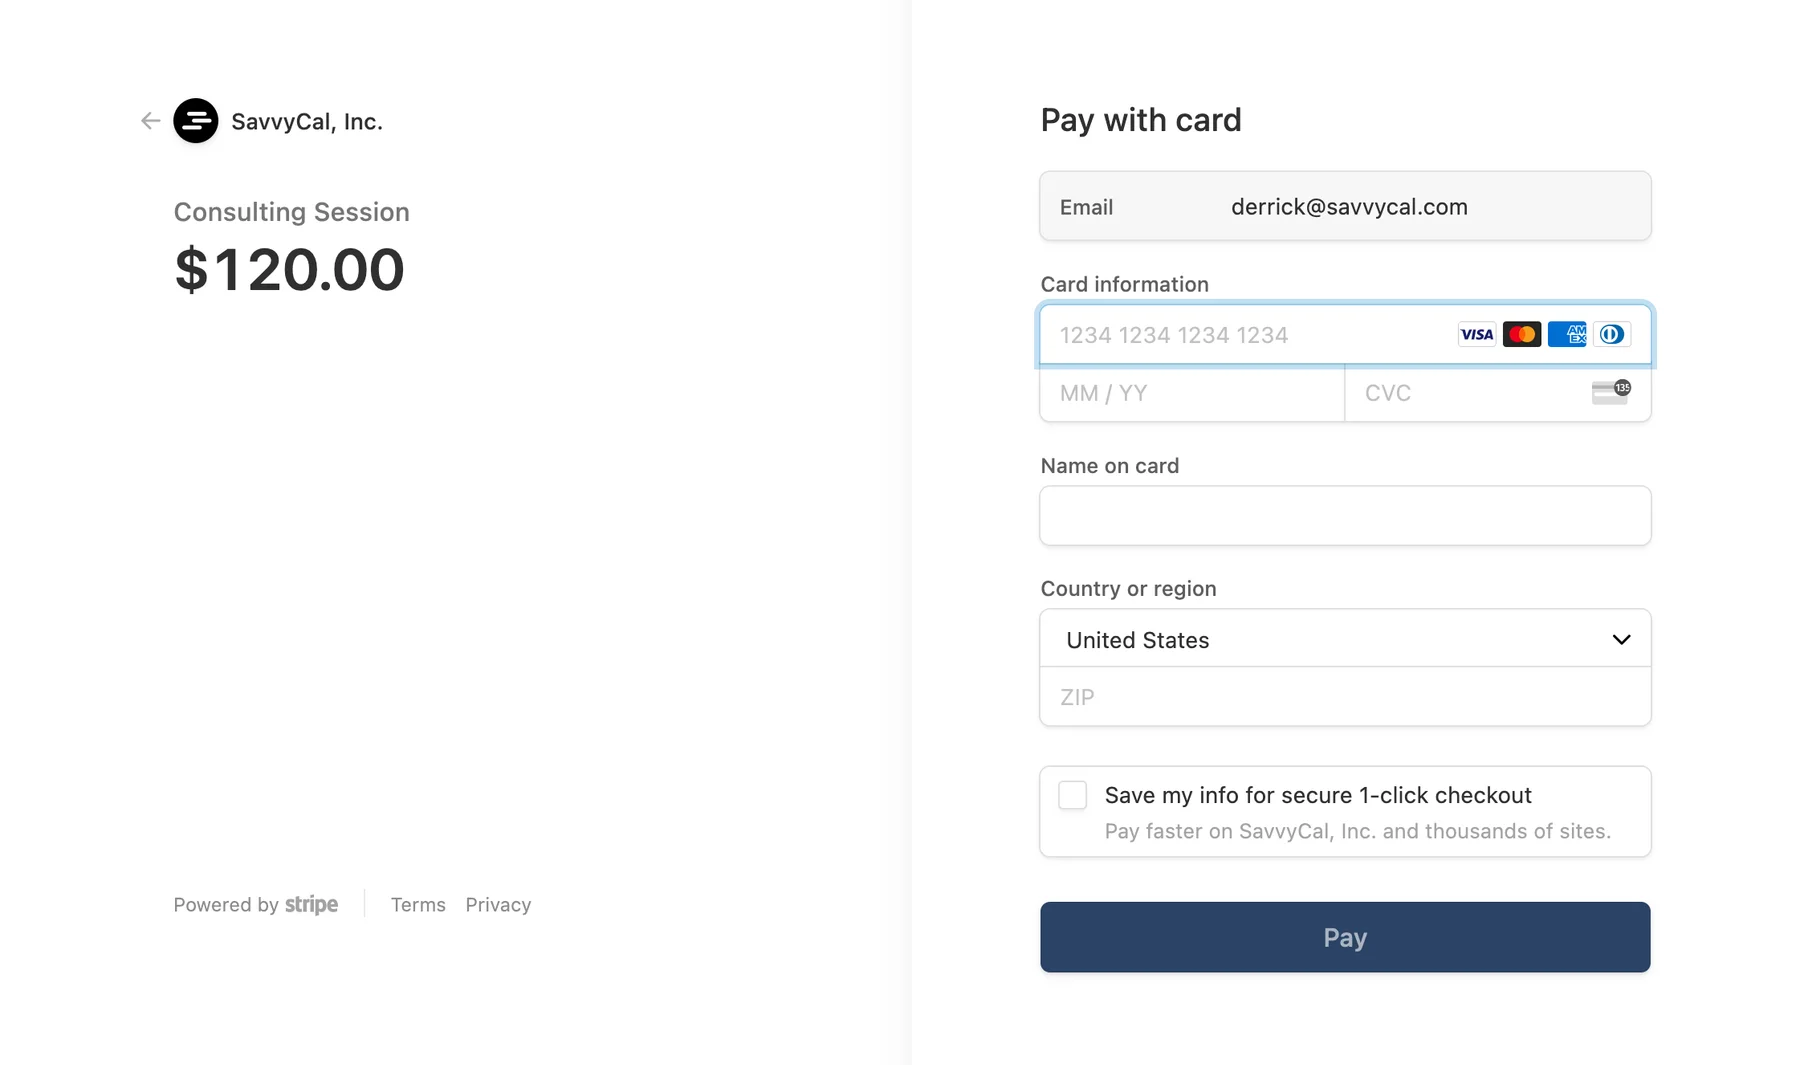
When they pay, Stripe sends them back to the SavvyCal confirmation page. SavvyCal confirms the event and sends the calendar invitations.
How long is the time held while they pay?
Up to two hours. When the scheduler clicks Proceed to checkout, SavvyCal creates the event with the Awaiting Payment status and holds the time so nobody else can book it. The hold also blocks the time on your other links.
No calendar invitations or emails go out while the event is waiting for payment.
What happens if they don't finish checking out?
SavvyCal releases the time, and the event's status changes to Checkout Expired. That happens:
- Right away if the scheduler leaves Stripe Checkout with the back link. They land back on the page they booked from and can pick a time again.
- After two hours if they close the page or never finish paying. The Stripe Checkout page expires at the same time, so they can't pay late.
Expired events stay on the Events page; set Status to Checkout Expired to see them. See Managing booked events.
Does canceling an event refund the payment?
No. SavvyCal never refunds payments automatically, whether you cancel the event, the scheduler cancels, or you decline a request. Refunds come with Stripe fees, so it's up to you whether to give one.
To refund a payment, find it in your Stripe dashboard and refund it there.
What happens when a paid event is rescheduled?
Nothing changes with the payment. Moving the event, whether you do it or the scheduler does, doesn't charge again or refund anything. An event that's still waiting for payment stays waiting for payment. See Rescheduling an event as the organizer.
Can I collect payment and require approval?
Yes. The scheduler pays first. Once they've paid, the event moves to Awaiting Approval instead of being confirmed, and you approve or decline it as usual. See Require approval for new events.
Declining a paid request doesn't refund it. Refund it in Stripe if you need to.
Does it work on team links?
Yes, on round robin and collective links. Every booking is charged to the Stripe account chosen in the link's payment settings, no matter which host gets the meeting.
Group links can't collect payment. On a group link, Collect payments for this scheduling link is grayed out, and its info icon says "Payments cannot be enabled for group sessions at this time."
If a teammate set up payments on a link with a Stripe account you can't use, the link's payment settings are read-only for you, with the message "This payment rule was configured by [name] using their Stripe account. Only they can modify these settings."
Do I have to pay when I book on someone's behalf?
No. When you use Book an event to book a meeting for someone, SavvyCal skips checkout and confirms the event right away.
Where do I see payments?
- In Stripe: every payment is in your Stripe dashboard.
- On the Events page: the status shows whether the scheduler has paid. Awaiting Payment means they haven't finished checkout, and Checkout Expired means they never did. Paid events show their normal status, such as Confirmed. SavvyCal doesn't show the amount paid in the app or in the CSV export.
- In the API and webhooks: each event includes its payment status, the total charged, and a link to the payment in Stripe. See webhooks.
What happens if I disconnect Stripe?
Go to Settings > Integrations, open the menu next to the Stripe account, and choose Delete. Then click Disconnect Stripe. Only the person who connected it, or an owner or admin of the organization, can disconnect it.
Disconnecting removes the account's payment settings from every link that used it. Those links stop charging and take free bookings until you open Payments on each one and pick another account and product.
Payments you already collected stay in your Stripe account.
Why are Apple Pay and Google Pay missing from checkout?
They have to be turned on for SavvyCal in your Stripe payment method settings. Follow Configuring Stripe payment methods.
If you turned on Collect tax automatically, Stripe also limits when wallets appear: Google Pay only shows for checkouts that collect a shipping address, and Apple Pay only shows in browsers that support Apple Pay version 12.
Still have a question? Contact support.